
Saffron Fields Design Studio
Welcome into my studio!

If you haven't already, be sure to visit my shop http://www.etsy.com/shop/saffronfields. There you will find beautiful one-of-a kind handcrafted yarn wreaths, plus vintage clothing, woodcarvings, collector knives and tools, botanical book plates, 1960s ads, and upcycled shoes and bags. I make my embellishments and wreaths from "scratch". I am the creative executive, product designer, buyer, yarn wrapper, rose roller, felt cutter, lighting and set designer, writer, SEO consultant, lace gatherer, seamstress, 3D fabricator, photographer, finance wizard, IT technician, customer service rep, and fulfillment manager. Please be sure to bookmark or favorite my shop and visit often. Oh, I would love to hear from you too!
Tutorial: How to paint your shoes!
Because it takes me a long while between updates, I've created this tutorial to entertain you and also to show you HOW TO PAINT YOUR SHOES! We don't all paint our shoes, but I did it for my Etsy store, and it was frightening and very gratifying. This time I took step-by step photos, which I feel I must share. My best advice, for those who are interested in trying it out, is, Just do it! Buy a pair of old shoes and have fun.
 |
| Mix well! |
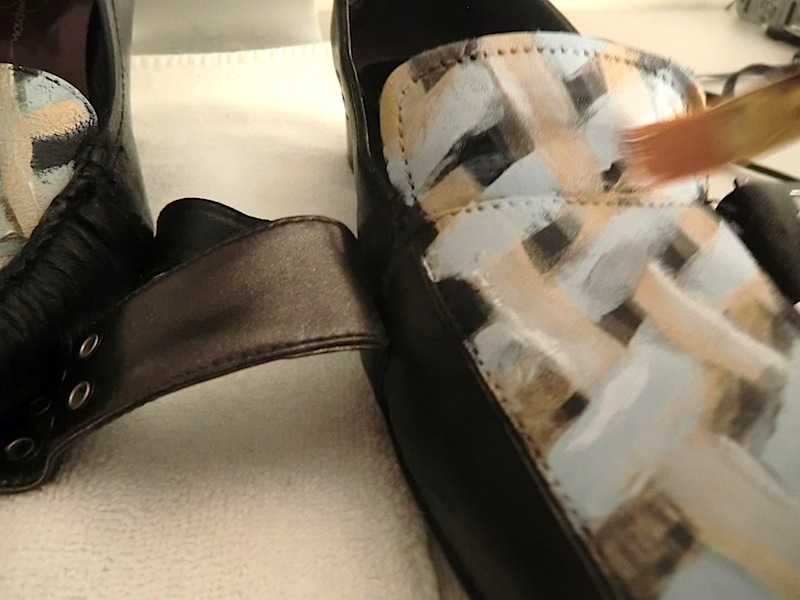
 Step one: draw guide lines. |
Note: the shoe on the left is a finished shoe. I'm using it as an example. I was too nervous to create a new pattern! lol
 Just three or four each way. |
Paint three to four diagonal lines seam to seam, one way, then repeat going the other direction.You can use any colors. This criss-cross undercoat will serve as the template or basic pattern to follow.
 |
| Step two: layer on more paint. |
 |
| Add strips of color. |
Keep adding layers of paint. I used gold for the vertical stripes and blue for the opposite direction.
 |
| Step three: add depth. |
Step four is the trickiest, which is, trying to make the lines look like they're overlapping. To do that, paint edges and corners with tiny lines of gray and white. As you can see, my overlaps are not perfect. I just did enough to give the ILLUSION of depth and interweaving.
 |
| Step four: buckle up. |
Your eyes are going to tell your brain to make sense of the design and the overall look will turn out quite satisfactory. Left to right = plain to transformed! Finish off with a glaze if you wish.
 |
| Step five: photographer! |
No comments:
Post a Comment